Quick Start Instructions For TechWorks Mitsubishi 3000gt/Stealth ECS Controller
TechWorks ECS Model 03 Running Firmware v3.x
Note: The complete PDF manual can be found at http://www.renegadetechworks.com under the Installation menu.
Modes of Operation
The TechWorks ECS Suspension controller has 8 different modes of operation
· Mode 1: Manual Mode: Allows you to manually set and lock the struts into Hard, Medium or Soft stiffness settings
· Mode 2: Auto Mode: Controller will automatically adjust the stiffness of the struts based on G forces being experienced
· Mode 3: Set LED Brightness: Let you adjust the default LED brightness if you have the addon led display
· Mode 4: Set Default Startup: Lets you save the current mode (auto or manual) as the default startup mode
· Mode 5: Read Diagnostics: will use the Sport/Tour lights to display any fault conditions that have been detected
· Mode 6: Run Diagnostics: will execute a test of each strut one at a time and display results using Sport/Tour lights
· Mode 7: Set Auto Mode G Force Thresholds: Lets you adjust the G-Forces transition levels for auto mode
· Mode 8: Logging Mode: enables logging via the ECS communications port.
Changing the Controller to Manual Mode or Auto Mode
· Pressing the ECS console switch two times quickly will toggle the ECS controller from Manual Mode to Auto mode and vice versa.
· When the controller enters Manual Mode the SPORT & TOUR lights will blink together 3 times very quickly
· When the controller enters Auto Mode the SPORT & TOUR lights will alternately blink 3 times very quickly
Manual Mode Operation
· In Manual Mode when the ECS pushbutton switch is pressed once and released it will change the struts to the next hardness setting:
Soft -> Medium -> Hard -> Soft -> Medium -> Hard -> .......
· The Sport/Tour lights will light appropriately to indicate what mode the Struts are in
· SPORT Light ON = Struts in HARD mode
· SPORT & TOUR Light ON = Struts in MEDIUM mode
· TOUR Light ON = Struts in SOFT Mode
· NOTE: If a strut has an error it will be reported as described below in the Error Conditions section after each attempt. Every time you press the ECS switch in manual, it will clear any previous fault conditions and try to command all 4 struts into the next desired mode.
Auto Mode Operation
· In Auto Mode the TechWorks ECS controller will automatically adjust the stiffness settings of each strut individually depending upon the g-force acceleration readings of the internal 6-axis accelerometer as shown below:
· Normal Driving: with no significant acceleration / braking or turning – ALL four struts will be in SOFT mode.
· Soft Braking : Front Left & Front Right Struts will be set to MEDIUM mode
· Hard Braking : Front Left & Front Right Struts will be set to HARD mode
· Soft Acceleration : Rear Left & Rear Right Struts will be set to MEDIUM mode
· Hard Acceleration : Rear Left & Rear Right Struts will be set to HARD mode
· Soft Right Turn : Front Left & Rear Left Struts will be set to MEDIUM mode
· Hard Right Turn : Front Left & Rear Left Struts will be set to HARD mode
· Soft LEFT Turn : Front Right & Rear Right Struts will be set to MEDIUM mode
· Hard LEFT Turn : Front Right & Rear Right Struts will be set to HARD mode
· Auto Mode Strut Default Stiffness Setting: When Auto Mode is first entered – the Base Strut Bias Stiffness setting is SOFT. This means that the range of stiffness settings that will automatically be applied to the struts ranges from SOFT , MEDIUM & HARD as shown above.
· When In Auto Mode if the ECS pushbutton switch is pressed once and released it will change the strut default stiffness setting to MEDIUM hardness setting (this will be indicated by the SPORT & TOUR light turning on). This forces all four struts to their MEDIUM stiffness setting for the default under normal driving conditions and will change them HARD only when a HARD condition is detected as listed above. Pressing the ECS button once again will toggle the default hardness setting back to SOFT (only Tour Light ON).
· When in AUTO mode the Sport Tour lights will change to show the strut Stiffness Settings automatically changing by cycling the Sport & Tour lights thru the various stiffness settings as follows
· SPORT Light ON = Some of the Struts are in HARD mode
· SPORT & TOUR Light ON = Some of the Struts are in MEDIUM mode
· TOUR Light ON = ALL of the Struts are in SOFT Mode
Startup
· Step 1 -On a power up condition - Both the SPORT & TOUR Lights will be turned on at the same time for approximately 3 secs as a test of the lights so you can see that the lights are not burned out .
· Step 2 – Next the Controller will enter the default startup mode stored in memory and will do one of the following :
· If the Default Startup Mode is Manual Mode the SPORT / TOUR lights will blink together 3 times very quickly
· If the Default Startup Mode is Auto Mode the SPORT / TOUR lights will alternately blink 3 times very quickly
Error Conditions and Display
· Sport & Tour Light Blinking together every 30 secs = Command Mode Failure. Indicates the controller was not able to command one or more of the struts into the desired mode.
· Alternating Blinking Sport & Tour Lights every 30 secs = Signal Wire Failure. Indicates controller detected what is very likely either a broken signal or ground wire to the strut cap harness to one of the struts.
Set LED Brightness Mode
· Press the ECS pushbutton switch THREE times Quickly to set the LED default brightness
· You will see the SPORT& TOUR Lights & The Front LEFT/Front RIGHT LED lights blink three times to indicate you have entered the LED Brightness mode setting
· The four LEDs will change to different colors so you can see their brightness levels
· Press the ECS pushbutton switch ONCE to change to the next brightness level. There are FOUR brightness levels and & each press of the switch will cycle thru to the next level.
· Press the ECS pushbutton switch TWICE quickly to save the current selected LED brightness level as the default
· You will see the SPORT& TOUR Lights & The Front LEFT/Front RIGHT LED lights blink three times to indicate that you have exited & saved LED Brightness mode setting & will return to the previous operating mode.
Set Default Startup Mode
· Press the ECS pushbutton switch FOUR times Quickly to save the current ECS controller mode (i.e. controller is in auto or manual mode) as the default startup mode for the ECS Controller when the car starts.
· You will see the SPORT& TOUR Lights & The Front LEFT/Front RIGHT LED lights blink Four times to indicate you have saved the current ECS mode as the default startup mode
· The controller will immediately return to the current operating mode (manual or auto).
Diagnostic Modes
The TechWorks ECS Controller has two different diagnostic modes:
· READ FAULT DIAGNOSTICS mode - this mode allows you to retrieve any current fault conditions that the controller has detected since the last press of the ECS switch. This test does not actively operate the struts like #2 does.
· RUN DIAGNOSTICS mode - this mode allows you to execute the diagnostic routine that will test each of the four ECS struts in order and display results.
· NOTE: execution of the RUN DIAGNOSTICS mode will reset and clear any fault codes that the READ FAULT DIAGNOSTICS mode may have stored while the car was in operation.
READ FAULT DIAGNOSTICS Mode
· Press the ECS pushbutton switch FIVE times Quickly to enter READ FAULT DIAGNOSTICS mode
· You will see the Sport Tour lights & Front Left /Front Right LED lights blink FIVE times to indicate READ Diagnostics mode
· The Read Fault Diagnostic Routine will then start and report the current status of each of the struts (1,2,3,4) in order.
The order of the reporting is:
· Strut 1: Front Left Strut
· Strut 2: Front Right Strut
· Strut 3: Rear Left Strut
· Strut 4: Rear Right Strut
· The Reporting Sequence & Tour/Sport lights display for a given strut is as follows:
Step (1) Strut Number Being Reported: Just the Sport Light will blink a number of times with a pause in between equal to the strut number being reported. For example if just the Sport light blinks 3 times quickly, pauses, blinks 3 times quickly, pauses, blinks 3 times quickly - then strut 3: Rear Left is about to be reported.
Step(2) Strut Fault Conditions Report Results (what the lights will do):
(2a) STRUT TESTS OK: If the strut being reported has no fault conditions and has been operating normally , then the SPORT & TOUR lights will both light up SOLID for several seconds.
(2b) STRUT COMMAND FAILURE: If the strut being reported experienced a command failure fault condition since the last press of the ECS switch then the SPORT & TOUR lights will both blink 3 times quickly with a long pause between and then will blink 3 times quickly again with a long pause between and will then blink 3 times quickly for the last time.
(2c) SIGNAL WIRE FAILURE: If the strut being reported experienced a signal wire failure fault condition since the last press of the ECS switch then the SPORT & TOUR lights will alternately blink on and off (Sport light ON/ Tour Light OFF then Sport Light OFF / Tour Light ON ) 8 times - this is indicating that while the car was running the controller detected what is very likely either a broken signal wire or ground wire to the strut cap harness
At the end of step (2) All lights will be turned off. .
Step (3) Next Strut: testing will now proceed to the next strut and start over with Step(1)
· To Exit Diagnostic Mode – press the ECS switch once. You can also turn the ignition off & back on. Upon exiting Diagnostic mode the controller will enter the previous mode of operation
RUN DIAGNOSTICS Mode
· Press the ECS pushbutton switch SIX times Quickly to enter RUN DIAGNOSTICS mode
· The Sport Tour lights & Front Left /Front Right LED lights blink SIX times to indicate RUN Diagnostics mode
· The RUN Diagnostic Routine will then start and will test each of the struts (1,2,3,4) in order performing the same test sequence for each strut. The order of the test is:
· Strut 1: Front Left Strut
· Strut 2: Front Right Strut
· Strut 3: Rear Left Strut
· Strut 4: Rear Right Strut
· The Test Sequence & Tour/Sport lights display for a given strut is as follows:
Step (1) Strut Number Being Tested: Just the Sport Light will blink a number of times with a pause in between equal to the strut number being tested.
For example if just the Sport light blinks 3 times quickly, pauses, blinks 3 times quickly, pauses, blinks 3 times quickly - then strut 3: Rear Left is about to be tested. NOTE: During STEPS (2) , (3) & (4) The Sport & Tour Lights will be OFF.
Step (2) HARD Mode Test: controller attempts to put the strut into HARD Mode and the controller logs if the test was successful. No lights are displayed - the sequence proceeds to the next step.
Step (3) MEDIUM Mode Test: controller attempts to put the strut into MEDIUM Mode and the controller logs if the test was successful. No lights are displayed - the sequence proceeds to the next step.
Step (4) SOFT Mode Test: controller attempts to put the strut into Soft Mode and the controller logs if the test was successful. No lights are displayed - the sequence proceeds to the next step.
Step (5) Strut Test Results:
(5a) STRUT TESTS OK: If the strut just tested , tested OK and was able to be put into all three modes without any errors, then both the SPORT & TOUR lights will light up SOLID at the same time for several seconds.
(5b) STRUT COMMAND FAILURE: If the strut was not able to be commanded into hard, medium & soft mode, then the SPORT & TOUR lights will both blink 3 times quickly with a long pause between and then will blink 3 times quickly again with a long pause between and will then blink 3 times quickly for the last time.
(5c) SIGNAL WIRE FAILURE: If during the test a strut signal wire failure was detected, the SPORT & TOUR lights will alternately blink on and off (Sport light ON/ Tour Light OFF then Sport Light OFF / Tour Light ON ) 8 times - this is indicating that the controller detected what is very likely either a broken signal or ground wire to the strut cap harness
At the end of step (5) All lights will be turned off. .
Step (6) Next Strut: testing will now proceed to the next strut and start over with Step(1)
· To Exit Diagnostic Mode - press the ECS switch once Then let go to exit the testing cycle. You can also turn the ignition off & back on. Upon exiting Diagnostic mode the controller will enter Manual Mode operation
Set Auto Mode G-Force Threshold Transition Levels
· The G-Force threshold transition levels are the amount of G-Forces that the car must experience to cause an automode transition of the struts from Soft to Medium mode or Medium to Hard Mode.
· The Techworks controller has FIVE different G-Force Threshold level combinations
· Press the ECS pushbutton switch SEVEN times Quickly to set the Auto Mode G-force Threshold Transition Levels.
· You will see the SPORT& TOUR Lights & The Front LEFT/Front RIGHT LED lights blink Seven times to indicate you have entered Threshold mode
· Now Press the ECS pushbutton switch ONCE to change to the next threshold level.
· After pressing the switch you will see the SPORT& TOUR Lights & The Front LEFT/Front RIGHT LED lights blink a number of times to indicate which threshold level combination you are on.
· For example:
· If the lights blink once – you are on threshold setting LEVEL 1
· If the lights blink twice – you are on threshold setting LEVEL 2
· If the lights blink five times – you on threshold setting LEVEL 5
· To Save the current selected threshold level & exit: Press the ECS pushbutton switch Twice Quickly . The SPORT& TOUR Lights & The Front LEFT/Front RIGHT LED lights blink Seven times to indicate you have saved the current selected level and will exit the controller back to the previous running mode (Manual or Auto).
· NOTE: The Factory Default is Threshold Level 2.
· Threshold Levels:
o Threshold Level 1 (lights blink 1 times)
§ G-Forces of 0.1 g’s will transition struts to MEDIUM
§ G-Forces of 0.3 g’s will transition struts to HARD
o Threshold Level 2 (lights blink 2 times)
§ G-Forces of 0.2 g’s will transition struts to MEDIUM
§ G-Forces of 0.4 g’s will transition struts to HARD
o Threshold Level 3 (lights blink 3 times)
§ G-Forces of 0.3 g’s will transition struts to MEDIUM
§ G-Forces of 0.5 g’s will transition struts to HARD
o Threshold Level 4 (lights blink 4 times)
§ G-Forces of 0.4 g’s will transition struts to MEDIUM
§ G-Forces of 0.6 g’s will transition struts to HARD
o Threshold Level 5 (lights blink 5 times)
§ G-Forces of 0.5 g’s will transition struts to MEDIUM
§ G-Forces of 0.7 g’s will transition struts to HARD
Logging Mode
· To use Logging mode you must have a PC or Mac with the Arduino IDE installed & usb-ftdi adapter cable connected to the programming port on the side of the ECS controller
· Start the Arudino IDE and from the TOOLS menu start the SERIAL MONITOR function – On your serial monitor output you should see:
*************************************************************************
Renegade Techworks Mitsubishi 3000gt/Stealth ECS Controller
Firmware Version M03 v3.3
Strut G-Force Medium Threshold: 0.20
Strut G-Force Hard Threshold: 0.40
**************** Accelerometer Calibration Values *********************
EProm X Neg Axis 1g Calibration: 16704
EProm Y Neg Axis 1g Calibration: 16448
EProm Z Neg Axis 1g Calibration: 17920
EProm X Pos Axis 1g Calibration: 16512
EProm Y Pos Axis 1g Calibration: 17344
EProm Z Pos Axis 1g Calibration: 15744
*************************************************************************
· Press the ECS pushbutton switch EIGHT times Quickly to enter logging mode. You will see the SPORT& TOUR Lights & The Front LEFT/Front RIGHT LED lights blink EIGHT times to indicate you have entered Logging mode
· On your serial monitor output you should see:
**********************************************************************
LogSequence #:1
******** Strut GForce Transition Thresholds ********
Medium Threshold: 0.20
Hard Threshold: 0.40
**************** Accelerometer Calibration Values *********************
EProm X Neg Axis 1g Calibration: 16704
EProm Y Neg Axis 1g Calibration: 16448
EProm Z Neg Axis 1g Calibration: 17920
EProm X Pos Axis 1g Calibration: 16512
EProm Y Pos Axis 1g Calibration: 17344
EProm Z Pos Axis 1g Calibration: 15744
*************************************************************************
1:Time, 2:Controller Mode, 3:Controller Target , 4:AccFWD, 5:AccLeftRight,6:AccUP,7:Strut Name, 8:FL Strut STatus, 9:FL Target, 10:FL Strut Actual,11:Strut Name, 12:FR Strut STatus, 13:FR Target, 14:FR Strut Actual,15:Strut Name, 16:RL Strut STatus, 17:RL Target, 18:RL Strut Actual19:Strut Name, 20:RR Strut STatus, 21:RR Target, 22:RR Strut Actual
28564,MANUAL,HARD,0.02,0.10,0.00,FL,STRUT_OK,T=HARD,HARD, FR,STRUT_OK,T=HARD,HARD, RL,STRUT_OK,T=HARD,HARD, RR,STRUT_OK,T=HARD,HARD
28577,MANUAL,HARD,0.04,0.20,0.00,FL,STRUT_OK,T=HARD,HARD, FR,STRUT_OK,T=HARD,HARD, RL,STRUT_OK,T=HARD,HARD, RR,STRUT_OK,T=HARD,HARD
28588,MANUAL,HARD,0.05,0.30,0.00,FL,STRUT_OK,T=HARD,HARD, FR,STRUT_OK,T=HARD,HARD, RL,STRUT_OK,T=HARD,HARD, RR,STRUT_OK,T=HARD,HARD
28599,MANUAL,HARD,0.07,0.41,0.00,FL,STRUT_OK,T=HARD,HARD, FR,STRUT_OK,T=HARD,HARD, RL,STRUT_OK,T=HARD,HARD, RR,STRUT_OK,T=HARD,HARD
28612,MANUAL,HARD,0.09,0.51,0.00,FL,STRUT_OK,T=HARD,HARD, FR,STRUT_OK,T=HARD,HARD, RL,STRUT_OK,T=HARD,HARD, RR,STRUT_OK,T=HARD,HARD
28623,MANUAL,HARD,0.11,0.61,0.00,FL,STRUT_OK,T=HARD,HARD, FR,STRUT_OK,T=HARD,HARD, RL,STRUT_OK,T=HARD,HARD, RR,STRUT_OK,T=HARD,HARD
28634,MANUAL,HARD,0.12,0.71,0.00,FL,STRUT_OK,T=HARD,HARD, FR,STRUT_OK,T=HARD,HARD, RL,STRUT_OK,T=HARD,HARD, RR,STRUT_OK,T=HARD,HARD
· Press the ECS pushbutton switch EIGHT times Quickly to exit logging mode. You will see the SPORT& TOUR Lights & The Front LEFT/Front RIGHT LED lights blink EIGHT times to indicate you have exited Logging mode
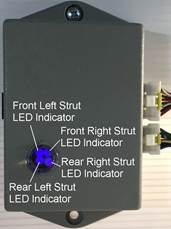
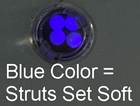
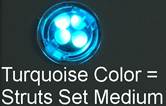
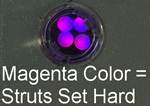
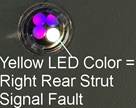
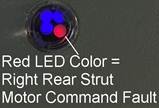
Integrated Status & Diagnostic LEDS
Mounting Instructions
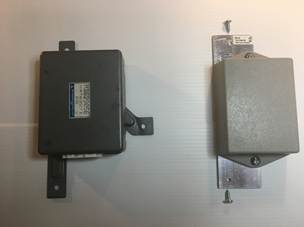
Using the provided Mounting Bracket – Mount the Techworks ECS Controller as shown.
Only the original Top & Bottom OEM mount Points are used. Used the Provided Mounting Screws
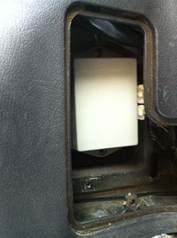
Note that the factory oem cable connectors need to be routed so they plug into the side of the unit unlike the factory unit where they come into the bottom.
You must install the Techworks ECS M03 in the orientation as shown in the picture above using the provided mounting bracket since the Accelerometer is using this mounting location & orientation to interpret the Gforces its reading relative to the chassis of the car. If you do not mount as shown the auto mode functions will not work correctly.